Quickstart
Getting started with Laktory is simple. Use the CLI quickstart command to set up a stack that aligns with the resources you want to deploy. You can choose from three templates, each tailored to specific deployment needs:
workflows: A workspace-based deployment that includes notebooks, notebook jobs, Laktory job pipelines, and Laktory DLT pipelines.workspace: A deployment focused on your Databricks workspace, covering directories, secrets, and SQL warehouses.unity-catalog: A deployment targeting your Databricks account, including resources like groups, users, catalogs, and schemas.
After you followed the installation instructions, open a command prompt and run the following command:
laktory quickstart
- Desired template: Choose between workflows, workspace and unity-catalog
- Infrastructure as Code backend: Select either
terraformorpulumi
Once these are selected, Laktory will generate the stack.yaml file, file, which acts as the main
entry point for declaring all your resources. The associated resources will also be created. Other than the stack.yaml
file, you are free to organize folder structures and file names as you see fit—there’s no strict convention to follow.
Workflows Stack¤
The workflows stack sets up and deploys three key components: a "Hello World!" Databricks job, a Laktory pipeline for
stock prices (as a Databricks Job and as a Delta Live Table), and all the necessary supporting resources.
Create Stack¤
To create the stack, use the following command:
laktory quickstart -t workflows
Files¤
After running the quickstart command, the following structure is created:
.
├── data
│   └── stock_prices.json
├── notebooks
│   ├── dlt
│   │   └── dlt_laktory_pl.py
│   └── jobs
│       ├── job_hello.py
│       └── job_laktory_pl.py
├── read_env.sh
├── requirements.txt
├── resources
│   ├── dbfsfiles.yaml
│   ├── job-hello.yaml
│   ├── notebooks.yaml
│   ├── pl-stocks-spark-dlt.yaml
│   └── pl-stocks-sql.yaml
├── sql
│   └── slv_stock_prices.sql
├── stack.yaml
Resources Directory¤
The files in the resources directory are referenced in the stack.yaml file and declare various resources to be
deployed. Each file specifies one or more resources.
Notebooks Directory¤
The notebooks directory contains the notebooks to be deployed to the Databricks workspace, as defined in the
resources/notebooks.yaml file. These notebooks are also referenced in job and pipeline definitions.
Data Directory¤
For the pipeline to run, a sample stock_prices.json data file is provided and will be uploaded to DBFS as declared in
resources/dbfsfiles.yaml.
Set Environment Variables¤
Before deployment, ensure the following environment variables are properly set, as referenced in the stack.yaml file:
DATABRICKS_HOST: The URL of your Databricks workspaceDATABRICKS_TOKEN: A valid Databricks personal access token
Deploy Stack¤
Now you are ready to deploy your stack. If you're using Terraform, start by initializing the environment:
laktory init --env dev
Then, deploy the stack:
laktory deploy --env dev
The deployment process will refresh the state of your Databricks resources and generate an execution plan using Terraform. Once the plan is generated, simply confirm by typing "yes" to proceed.
(laktory) osoucy@countach workflows % laktory deploy --env dev
databricks_dbfs_file.dbfs-file-stock-prices: Refreshing state... [id=/Workspace/.laktory/data/stock_prices/stock_prices.json]
databricks_notebook.notebook-job-laktory-pl: Refreshing state... [id=/.laktory/jobs/job_laktory_pl.py]
databricks_workspace_file.workspace-file-laktory-pipelines-pl-stocks-spark-dlt-json: Refreshing state... [id=/.laktory/pipelines/pl-stocks-spark-dlt.json]
databricks_workspace_file.workspace-file-laktory-pipelines-pl-stocks-sql-json: Refreshing state... [id=/.laktory/pipelines/pl-stocks-sql.json]
databricks_notebook.notebook-dlt-laktory-pl: Refreshing state... [id=/.laktory/dlt/dlt_laktory_pl.py]
databricks_notebook.notebook-job-hello: Refreshing state... [id=/.laktory/jobs/job_hello.py]
databricks_pipeline.pl-stocks-spark-dlt: Refreshing state... [id=dc28dbfb-0407-42fa-979f-94e17fa1fd30]
databricks_job.job-hello: Refreshing state... [id=808120666287598]
databricks_job.pipeline-databricks-job-job-pl-stock-sql: Refreshing state... [id=210130692451027]
databricks_permissions.permissions-job-hello: Refreshing state... [id=/jobs/808120666287598]
databricks_permissions.permissions-workspace-file-laktory-pipelines-pl-stocks-spark-dlt-json: Refreshing state... [id=/files/4435054900343469]
databricks_permissions.permissions-workspace-file-laktory-pipelines-pl-stocks-sql-json: Refreshing state... [id=/files/4435054900343468]

Note: Objects have changed outside of Terraform

Terraform used the selected providers to generate the following execution plan. Resource actions are indicated with the following symbols:
  + create
-/+ destroy and then create replacement

Terraform will perform the following actions:

  # databricks_dbfs_file.dbfs-file-stock-prices will be created
  + resource "databricks_dbfs_file" "dbfs-file-stock-prices" {
      + dbfs_path = (known after apply)
      + file_size = (known after apply)
      + id        = (known after apply)
      + md5       = "different"
      + path      = "/Workspace/.laktory/data/stock_prices/stock_prices.json"
      + source    = "./data/stock_prices.json"
    }
    [...]

Plan: 12 to add, 0 to change, 1 to destroy.

Do you want to perform these actions?
  Terraform will perform the actions described above.
  Only 'yes' will be accepted to approve.

  Enter a value: yes
After deployment, you can check the Databricks workspace to confirm that the pipeline job has been successfully deployed.
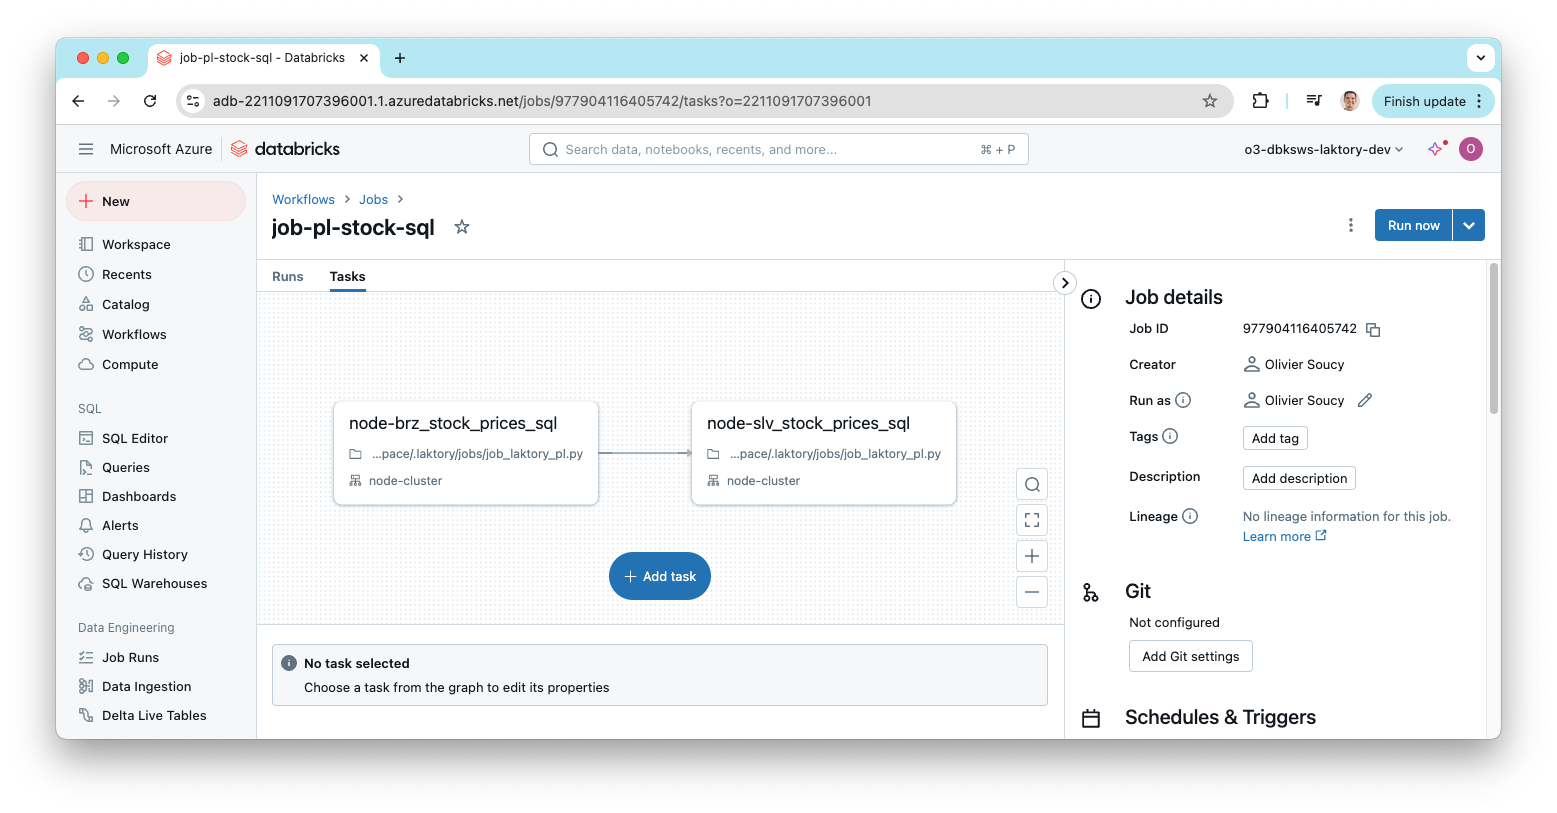
Run Pipeline Job¤
You can now run your pipeline either from the Databricks UI or using the Laktory CLI:
laktory run --env dev --job pl-stock-sql
(laktory) osoucy@countach workflows % laktory run --env dev --job job-pl-stock-sql
INFO - Getting id for job job-pl-stock-sql
INFO - Getting id for pipeline pl-stocks-spark-dlt
INFO - Getting id for job job-hello
INFO - Job job-pl-stock-sql run started...
INFO - Job job-pl-stock-sql run URL: https://adb-2211091707396001.1.azuredatabricks.net/?o=2211091707396001#job/977904116405742/run/1052232433102036
INFO - Job job-pl-stock-sql state: RUNNING
INFO -    Task job-pl-stock-sql.node-brz_stock_prices_sql state: PENDING
INFO -    Task job-pl-stock-sql.node-slv_stock_prices_sql state: BLOCKED
INFO -    Task job-pl-stock-sql.node-brz_stock_prices_sql state: RUNNING
INFO -    Task job-pl-stock-sql.node-brz_stock_prices_sql state: TERMINATED
INFO -    Task job-pl-stock-sql.node-slv_stock_prices_sql state: PENDING
INFO -    Task job-pl-stock-sql.node-slv_stock_prices_sql state: RUNNING
INFO -    Task job-pl-stock-sql.node-slv_stock_prices_sql state: TERMINATING
INFO - Job job-pl-stock-sql state: TERMINATED
INFO -    Task job-pl-stock-sql.node-slv_stock_prices_sql state: TERMINATED
INFO - Job job-pl-stock-sql run terminated after 232.99 sec with RunLifeCycleState.TERMINATED
INFO - Task job-pl-stock-sql.node-brz_stock_prices_sql terminated with RunResultState.SUCCESS
INFO - Task job-pl-stock-sql.node-slv_stock_prices_sql terminated with RunResultState.SUCCESS
Workspace Stack¤
The workspace stack declares and deploys some directories, a few secrets
and a SQL Warehouse.
Create Stack¤
To create the workspace stack, run the following command:
laktory quickstart -t workspace
Files¤
After running the command, the following structure will be generated:
.
├── read_env.sh
├── requirements.txt
├── resources
│   ├── directories.yaml
│   ├── secretscopes.yaml
│   └── warehouses.yaml
├── stack.yaml
Resources Directory¤
The files in the resources directory are referenced in the stack.yaml file and declare various resources to be
deployed. Each file specifies one or more resources.
Set Environment Variables¤
Before deployment, ensure the following environment variables are properly set, as referenced in the stack.yaml file:
DATABRICKS_HOST: The URL of your Databricks workspaceDATABRICKS_TOKEN: A valid Databricks personal access token
Deploy Stack¤
Once the environment variables are set, you’re ready to deploy the stack. If you're using Terraform, initialize your environment first:
laktory init --env dev
Then deploy the stack with:
laktory deploy --env dev
During the deployment, Laktory will refresh the state of your Databricks resources and generate an execution plan. You'll see a list of the resources to be created, updated, or destroyed. Confirm the execution by typing "yes" when prompted.
(laktory) osoucy@countach workspace % laktory deploy --env dev
databricks_directory.directory-laktory-dashboards: Refreshing state... [id=/.laktory/dashboards/]
databricks_directory.directory-laktory-dlt: Refreshing state... [id=/.laktory/dlt/]
databricks_directory.directory-laktory-jobs: Refreshing state... [id=/.laktory/jobs/]
databricks_secret_scope.secret-scope-laktory: Refreshing state... [id=laktory]
databricks_directory.directory-laktory-pipelines: Refreshing state... [id=/.laktory/pipelines/]
databricks_directory.directory-laktory-queries: Refreshing state... [id=/.laktory/queries/]
databricks_sql_endpoint.warehouse-laktory: Refreshing state... [id=d376fdc94855474e]
databricks_secret_acl.secret-scope-acl-laktory-users: Refreshing state... [id=laktory|||users]
databricks_secret.secret-scope-laktory-env: Refreshing state... [id=laktory|||env]
databricks_permissions.permissions-warehouse-laktory: Refreshing state... [id=/sql/warehouses/d376fdc94855474e]
Terraform used the selected providers to generate the following execution plan. Resource actions are indicated with the following symbols:
+ create
-/+ destroy and then create replacement
Terraform will perform the following actions:
# databricks_directory.directory-laktory-dashboards will be created
+ resource "databricks_directory" "directory-laktory-dashboards" {
+ delete_recursive = false
+ id = (known after apply)
+ object_id = (known after apply)
+ path = "/.laktory/dashboards/"
+ workspace_path = (known after apply)
}
[...]
Plan: 7 to add, 0 to change, 1 to destroy.
Do you want to perform these actions?
Terraform will perform the actions described above.
Only 'yes' will be accepted to approve.
Enter a value: yes
databricks_permissions.permissions-warehouse-laktory: Destroying... [id=/sql/warehouses/d376fdc94855474e]
databricks_directory.directory-laktory-dashboards: Creating...
databricks_secret_scope.secret-scope-laktory: Creating...
databricks_directory.directory-laktory-queries: Creating...
databricks_permissions.permissions-warehouse-laktory: Destruction complete after 0s
databricks_directory.directory-laktory-dashboards: Creation complete after 1s [id=/.laktory/dashboards/]
databricks_sql_endpoint.warehouse-laktory: Creating...
databricks_directory.directory-laktory-queries: Creation complete after 1s [id=/.laktory/queries/]
databricks_secret_scope.secret-scope-laktory: Creation complete after 1s [id=laktory]
databricks_secret.secret-scope-laktory-env: Creating...
databricks_secret_acl.secret-scope-acl-laktory-users: Creating...
databricks_secret_acl.secret-scope-acl-laktory-users: Creation complete after 0s [id=laktory|||users]
databricks_secret.secret-scope-laktory-env: Creation complete after 0s [id=laktory|||env]
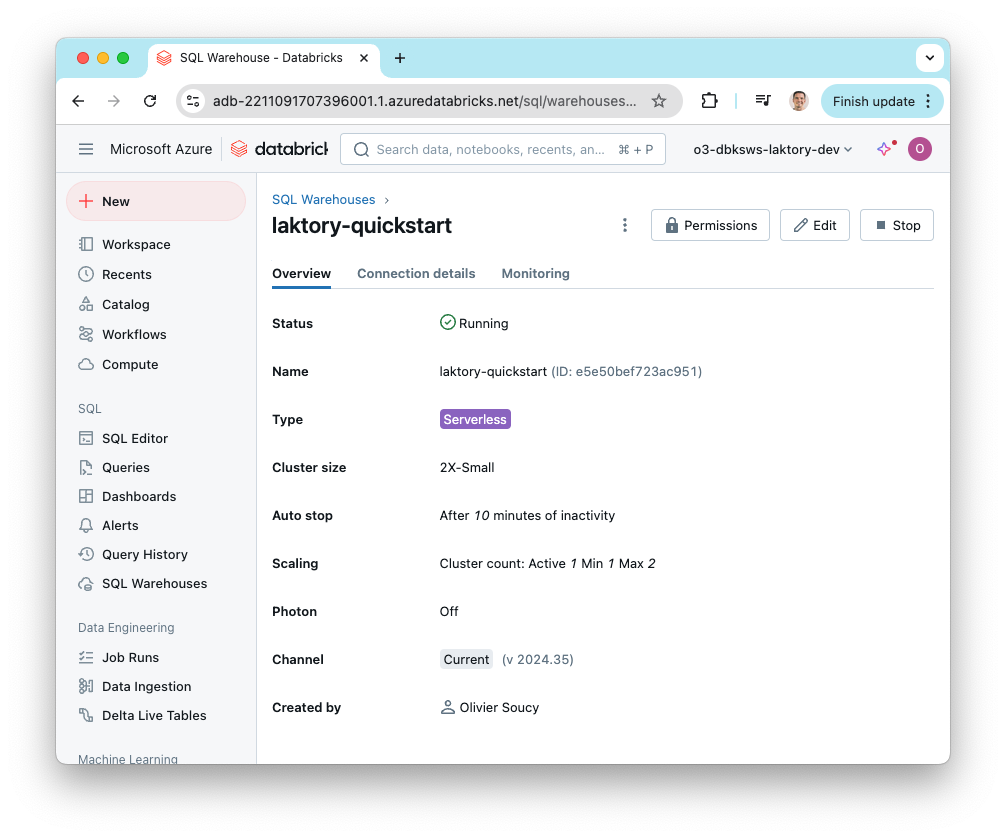
databricks_sql_endpoint.warehouse-laktory: Creation complete after 8s [id=e5e50bef723ac951]
databricks_permissions.permissions-warehouse-laktory: Creating...
databricks_permissions.permissions-warehouse-laktory: Creation complete after 2s [id=/sql/warehouses/e5e50bef723ac951]
Apply complete! Resources: 7 added, 0 changed, 1 destroyed.
Once the deployment completes, you can verify that the SQL warehouse and other
resources have been successfully created by checking the Databricks workspace.
Unity Catalog Stack¤
The unity-catalog stack deploys users, user groups, Unity Catalogs, catalogs, and schemas. This stack is more complex
than the previous ones, as it targets both the Databricks account (for user management) and the workspace (for catalog creation).
Create Stack¤
To create the Unity Catalog stack, run:
laktory quickstart -t unit-catalog
Files¤
After running the command, the following structure will be generated:
.
├── read_env.sh
├── resources
│   ├── catalogs.yaml
│   ├── groups.yaml
│   ├── schemas.yaml
│   └── users.yaml
├── stack.yaml
Resources Directory¤
The files in the resources directory are referenced in the stack.yaml file and declare various resources to be
deployed. Each file specifies one or more resources.
Stack Providers¤
In the stack.yaml, you will find the definition for two providers: databricks (for the account) and databricks.dev
(for the workspace). These may be formatted slightly differently if you’re using Pulumi.
providers:

  databricks:
    host: https://accounts.azuredatabricks.net
    account_id: ${vars.DATABRICKS_ACCOUNT_ID}
    azure_tenant_id: ${vars.AZURE_TENANT_ID}
    azure_client_id: ${vars.AZURE_CLIENT_ID}
    azure_client_secret: ${vars.AZURE_CLIENT_SECRET}
    auth_type: azure-client-secret

  databricks.dev:
    alias: dev
    host: ${vars.DATABRICKS_HOST_DEV}
    token: ${vars.DATABRICKS_TOKEN_DEV}
The databricks provider deploys resources to your Databricks account, while
databricks.dev handles deployments to the workspace. Although Unity Catalog
resources are shared across workspaces, catalogs, schemas, and tables must
still be deployed to a specific workspace, which is why the workspace provider
is needed.
In your resource definitions, the workspace provider is referenced like this:
options:
  provider: ${resources.databricks.dev}
Set Environment Variables¤
In this setup, more environment variables are required to deploy resources to both the Databricks account and workspace.
For the workspace provider:
DATABRICKS_HOST_DEV: The URL of your Databricks development workspaceDATABRICKS_TOKEN_DEV: A valid workspace token
For the account provider:
DATABRICKS_ACCOUNT_ID: The Databricks account IDAZURE_TENANT_ID: You Azure tenant IDAZURE_CLIENT_ID: The ID of the Azure Service Principal, which must be added as a Databricks account administratorAZURE_CLIENT_SECRET: The client secret of the Azure Service Principal
This setup is specific to Azure, but other authentication methods are available here
Deploy Stack¤
Once your environment variables are set, you are ready to deploy the stack. If you're using Terraform, first run the initialization command:
laktory init --env dev
Then, deploy the stack:
laktory deploy --env dev
Terraform will generate an execution plan, and you'll see the resources that will be created. Confirm the actions by typing "yes" when prompted.
(laktory) osoucy@countach unity-catalog % laktory deploy
Terraform used the selected providers to generate the following execution plan. Resource actions are indicated with the following symbols:
+ create
Terraform will perform the following actions:
# databricks_catalog.catalog-lqs-dev will be created
+ resource "databricks_catalog" "catalog-lqs-dev" {
+ enable_predictive_optimization = (known after apply)
+ force_destroy = true
+ id = (known after apply)
+ isolation_mode = "OPEN"
+ metastore_id = (known after apply)
+ name = "lqs-dev"
+ owner = (known after apply)
}
[...]
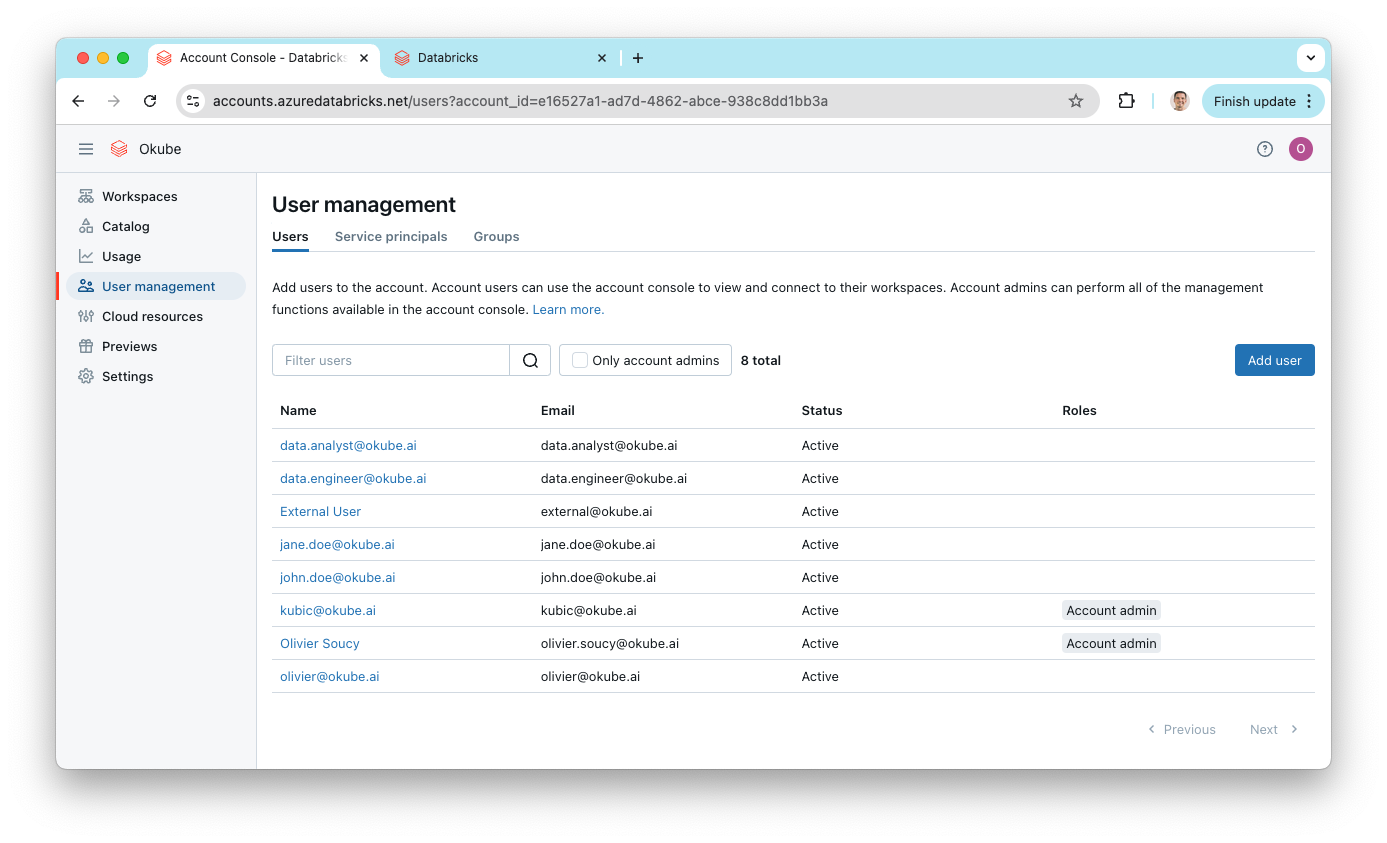
# databricks_user_role.user-role-account_admin-user-kubic-okube-ai will be created
+ resource "databricks_user_role" "user-role-account_admin-user-kubic-okube-ai" {
+ id = (known after apply)
+ role = "account_admin"
+ user_id = (known after apply)
}
Plan: 29 to add, 0 to change, 0 to destroy.
Do you want to perform these actions?
Terraform will perform the actions described above.
Only 'yes' will be accepted to approve.
Enter a value: yes
databricks_catalog.catalog-lqs-prd: Creating...
databricks_catalog.catalog-lqs-dev: Creating...
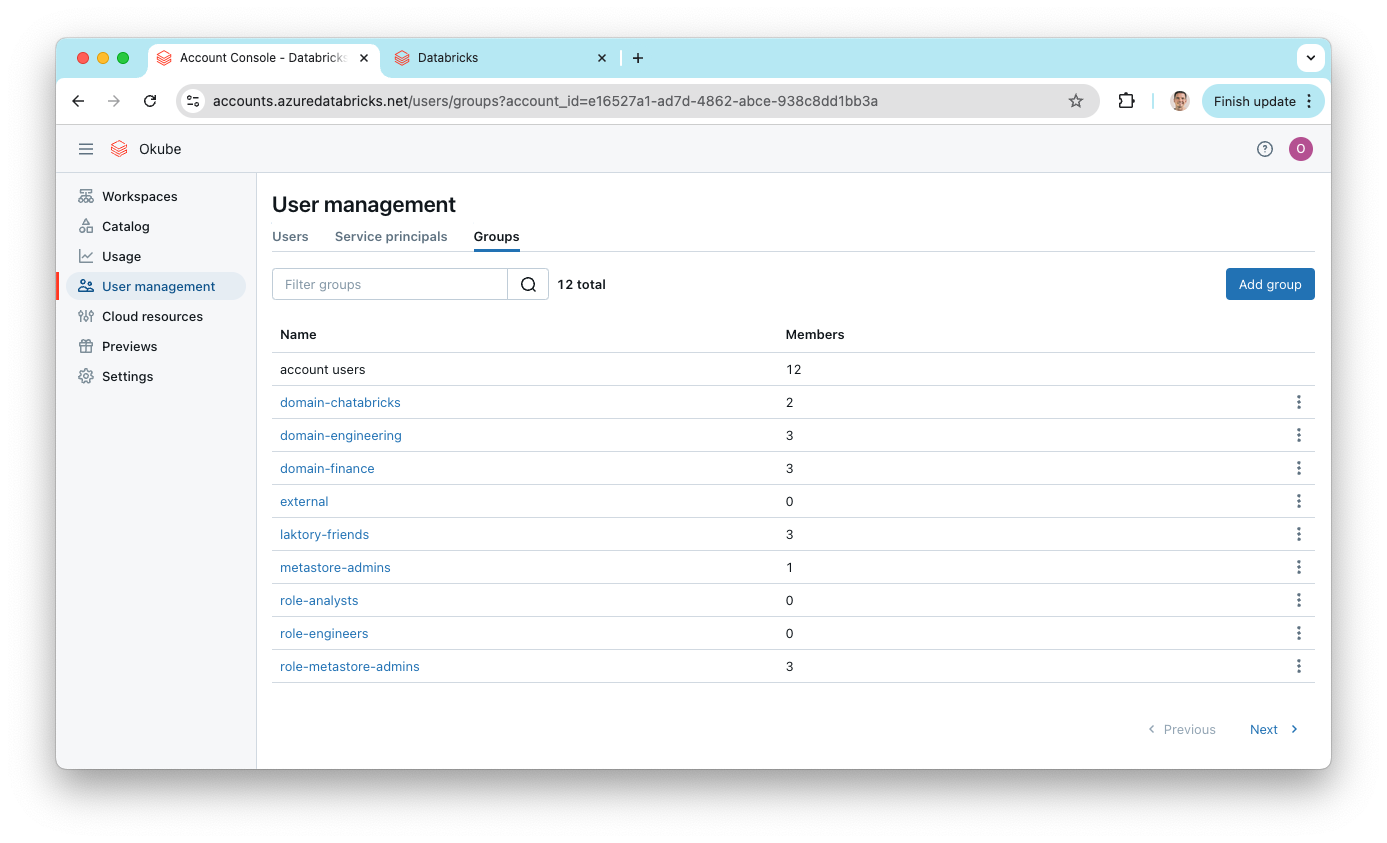
databricks_group.group-metastore-admins: Creating...
databricks_group.group-workspace-admins: Creating...
databricks_user.user-jane-doe-okube-ai: Creating...
databricks_group.group-laktory-friends: Creating...
databricks_user.user-kubic-okube-ai: Creating...
databricks_user.user-john-doe-okube-ai: Creating...
databricks_group.group-laktory-friends: Creation complete after 1s [id=978906969228198]
[...]
databricks_grants.grants-schema-lqs-prd-sandbox: Creation complete after 1s [id=schema/lqs-prd.sandbox]
After the deployment is complete, you can check the Databricks account for the newly created users and groups.
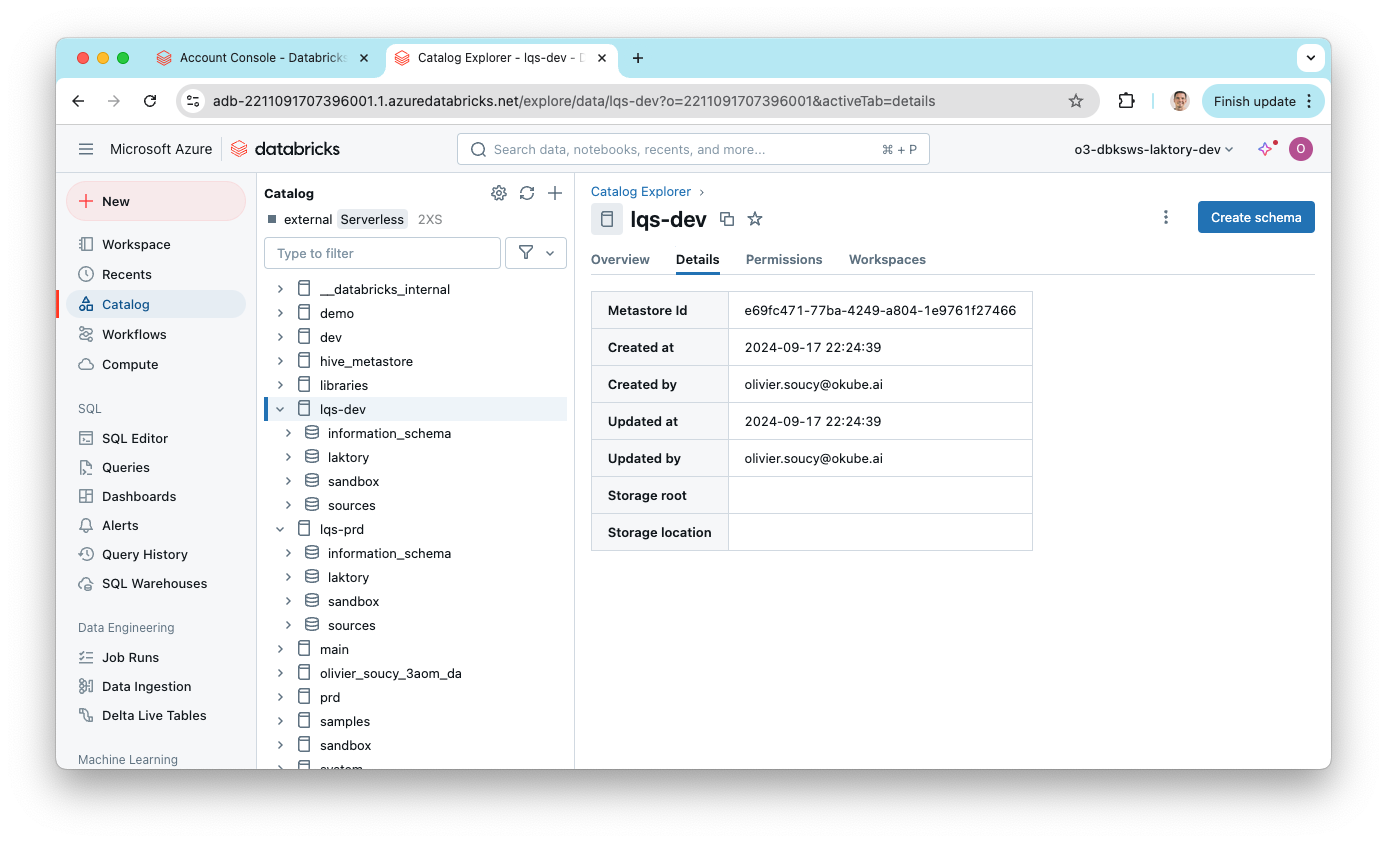
In the workspace, you'll see the catalogs and schemas that were deployed.
Demo¤
Watch Laktory Quickstart in action!